
THIS IS NOT A REAL PATTERN, this is the mutation of an existing idea created by another knitter, linked below to Mason-Dixon Knitting. I just had lots of bloggers wanting to know how I made my little version of the mutated buttonhole bag. Knit at your own peril. I love the Schaefer Esperanza for its color pooling, but you really have to mess around to get the right effects. If you don't like how it looks pre-felting, you won't like it post-felting, so feel free to frog & try again until you like the look. (I learned this the hard way and created the Felted Turd by mistake). Esperanza is really more of a wintertime yarn, perfect for scarves & hats, so you either have to call your LYS and see if they have any in their sale bins, or order online. Let me know if you get stuck and I'll see what I can do for you. :)
OK, here it is, FINALLY...actually here it isn't, this is the unofficial how-to on the Felted Groove Bag. I'll have an actual pattern you can print out with specs and everything soon. I was just so stinking excited it finally worked, I wanted to get the idea down here first. This bag came about as I was consumed by the cool buttonhole bag from Mason-Dixon Knitting, and I just started playing around and created this fun bag and have had lots of requests for how I did it.
There is an easy way to do this and a more difficult way. I promise to get better details up here soon. To get this amazing effect, I used Schaefer Esperanza hand painted yarn and 16" circular needles sized 13. Knit with one strand throughout. This yarn is a chunky weight alpaca and is VERY fuzzy/hairy and felts very well. I used about 250 yds, and the Schaefer yarn comes in 300 yd skeins.
Cast on between 76 and 100 stitches but make sure it's an even number. To get the cool color pooling, you need to have the last stitch you cast on be the same color as the first stitch. join, place marker and knit for 12 rounds. During the 12th row, you need to place an additional marker half-way through the round. (Equal number of stitches on each half.)
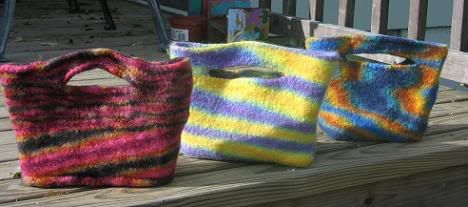
You will need to bind off 18 stitches exactly in the center of each half of the next round. (For example, on my yellow & purple diagonal striped bag, I had 76 stitches. This meant I knit 10, bound off 18, knit 10, moved marker, knit 10, bound off 18, knit 10, moved marker.)
The next round you will cast on (long-tail thumb wrap method works best) the 18 stitches where you had bound them off on the previous round. (my example of 76 original stitches makes this round: knit 10, cast on 18, knit 10, move marker, knit 10, cast on 18, knit 10, move marker)
Knit for about 12-13 more inches, then create bottom.
You can either do 9 rounds of purl & knit or you can do a mitered bottom. I'll have the pattern specs show instructions for both. Here, I'll show what I did on the yellow & purple bag:
Bottom:
round 1 purl
round 2 knit
round 3 purl
round 4 knit
round 5 purl
round 6 knit
round 7 purl
round 8 knit
round 9 purl
TURN BAG INSIDE OUT, then do a 3 needle bind-off to give a smooth and strong finish. If you made the bottom as listed above, you'll need to sew the gussets on the bottom corners of the bag. Sew in loose yarn strands, then fold the outer edges of the bottom of the bag into little triangles and sew along the first purl edge (about 3" from point) on each side. Tack this down and you're ready to felt. Turn it right side out, toss it in the washing machine and have fun!
Felt by normal methods but I STRONGLY RECOMMEND using a zippered pillow case as opposed to a lingerie bag as there's some SERIOUS fuzzies coming off this felting process. FELT THE CRAP out of the bag to give it more structure. I find that felting to where you cannot see stitches any longer gives it much better shape. It is important to find a box that stretches the bottom a bit while it is sitting drying. This helps give a more stable bottom for the bag. Feel free to pull and stretch bag into whatever shape works best for you. To help keep the shape, give it a good dose of steam to set things up once it's dry.
The Schaefer Esperanza does a really cool pooling effect, but if you want to shake thigs up a bit feel free to pull parts of the yarn and knot it to mess up the color scheme a little. This can make for some FUN effects. You'll have to sew in these loose ends once the bag is done as well. The yellow & purple diagonal striped bag was just knitted with no messing around with the yarn. The wild bag I made by snipping & restarting yarn at different points, just where I thought it would look interesting.
Again, I apologize for the messiness of this non-pattern, and hope to have something more readable and printable soon. PLEASE send me pics of any bags you make, as I'd love to post them here in a little Felted Groove Bag Gallery!

After Felting:


|